Get Real-Time GitHub Stars Notifications in Discord
After the refactoring of this website, folks (maybe you) started to spread the word about it. The statistics started to rise a little bit, and we discovered along the way that the repository holding this website also started to receive some new stars. To our knowledge, there’s no native way to get notified by GitHub when you receive stars on your repositories. So, we decided to do something about it!
We know, we know, tracking stars is a little bit linked to the gamification of the open source world, but to be honest, it’s still a fun way to keep track of your project’s popularity and engage with your community.
So, we decided to build a simple automation that would send a notification to a private Discord channel whenever our GitHub repository receives new stars. There are probably better ways to do this, existing solutions, but where is the fun in that?
After a few times of tweaking and testing, we finally got it working! 🎉
Here is the notification we received on our phone this afternoon:
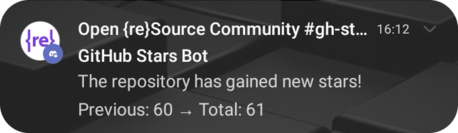
And when you click on the notification, here is how the notification appears on Discord, showing the new star count and the repository name:

Cool, right? Here’s how it’s been done!
Step 1: Create a Discord Webhook
Section titled “Step 1: Create a Discord Webhook”To send notifications to Discord, you will need to set up a webhook in your Discord server. Here’s how to do it:
- Open your Discord server and navigate to the channel where you want to receive notifications. You can create a dedicated private channel for this purpose.
- Click on the gear icon next to the channel name to access the channel settings.
- Select the “Integrations” tab.
- Click on “Webhooks” and then “Create Webhook.”
- Give your webhook a name (e.g. “GitHub Stars Bot”), and select a nice image.
- Copy the webhook URL, as you will need it later.
Here’s also a link to the Discord documentation - Intro to Webhooks for more information.
Step 2: Create a GitHub Repository
Section titled “Step 2: Create a GitHub Repository”Now, let’s create a private GitHub repository to store our future GitHub Actions workflow. You can create a new repository or use an existing one, make it public or private, as you prefer.
Step 3: Create a Secret Variable in GitHub
Section titled “Step 3: Create a Secret Variable in GitHub”To securely store your Discord Webhook URL to ensure that sensitive data isn’t exposed in your repository code, you will need to create a secret variable in your GitHub repository:
- Go to your GitHub repository and click on the “Settings” tab.
- In the left sidebar, click on “Secrets and variables” and then “Actions.”
- Click on the “New repository secret” button.
- Name your secret
DISCORD_WEBHOOK_URLand paste the webhook URL you copied from Discord.
Step 4: Create a GitHub Actions Workflow
Section titled “Step 4: Create a GitHub Actions Workflow”In this repository:
- Create a new directory called
.github/workflows. - Create a new file called for instance
gh-stars-to-discord.yml(or choose a name you prefer).
The Algorithm
Section titled “The Algorithm”The algorithm is rather simple:
- Every hour, the workflow will check the current number of stars on the repository using the GitHub API.
- While doing so, it will also check the rate limit of the API.
- If the rate limit is low, the workflow will stop.
- If not, it will compare the current number of stars with the previous number of stars.
- If there are new stars, it will send a notification to Discord using the webhook URL.
- Finally, it will save the current number of stars for the next comparison.
Using the GitHub API
Section titled “Using the GitHub API”To get started, you will need to use the GitHub REST API to fetch the star count for your repository. The GitHub API provides a simple way to access information about your repositories, including the number of stars they have received.
There is a public endpoint that you can use to get the star count for a specific repository:
GET https://api.github.com/repos/{owner}/{repo}Replace {owner} with your GitHub username and {repo} with the name of your repository. The response will include a JSON object with various details about the repository, including the stargazers_count field, which indicates the number of stars.
So for our main repository, you would make a request to:
GET https://api.github.com/repos/Open-reSource/openresource.devAt the time of writing, Open {re}Source main repository has 61 stars, so the answer would be:
{ // ... "stargazers_count": 61 // ...}The Actual Workflow
Section titled “The Actual Workflow”Now, let’s create the actual workflow:
- Clone your repository to your local machine or edit it directly on GitHub.
- Add the following YAML code to your
gh-stars-to-discord.ymlfile:
name: GitHub Stars to Discord
on:  schedule:    - cron: '0 * * * *' # Every 1 hour. You can change the frequency as needed.  workflow_dispatch: # Allows manual triggering
env:  DISCORD_WEBHOOK_URL: ${{ secrets.DISCORD_WEBHOOK_URL }}  GITHUB_REPOSITORY: 'open-reSource/openresource.dev' # Change this to your repository
jobs:  notify:    runs-on: ubuntu-latest
    steps:      - name: Get the current number of stars and check rate limit        id: get_stars        run: |          response=$(curl -s -i https://api.github.com/repos/${{ env.GITHUB_REPOSITORY }})          stars=$(echo "$response" | grep -oP '"stargazers_count":\s*\K\d+')          rate_limit_remaining=$(echo "$response" | grep -Fi 'X-RateLimit-Remaining:' | awk -F': ' '{print $2}' | tr -d '\r')
          echo "Current stars: $stars"          echo "Rate limit remaining: $rate_limit_remaining"
          echo "stars=$stars" >> $GITHUB_OUTPUT          echo "rate_limit_remaining=$rate_limit_remaining" >> $GITHUB_OUTPUT
      - name: Stop if rate limit is low        if: ${{ steps.get_stars.outputs.rate_limit_remaining < 10 }}        run: |          echo "Rate limit is low, exiting"          exit 1
      - name: Cache previous stars count        id: cache_previous_stars        uses: actions/cache@v4        with:          path: previous_stars.txt          key: stars-${{ github.repository }}-${{ github.run_id }}          restore-keys: |            stars-${{ github.repository }}-
      - name: Load the previous number of stars        id: load_previous_stars        run: |          if [ -f previous_stars.txt ]; then            echo "Loading previous stars"            PREVIOUS_STARS=$(cat previous_stars.txt)          else            echo "No previous stars found"            PREVIOUS_STARS=0          fi          echo "Previous stars: $PREVIOUS_STARS"          echo "previous_stars=$PREVIOUS_STARS" >> $GITHUB_OUTPUT
      - name: Compare and notify if new stars        if: ${{ steps.get_stars.outputs.stars != steps.load_previous_stars.outputs.previous_stars }}        run: |          NEW_STARS=${{ steps.get_stars.outputs.stars }}          PREVIOUS_STARS=${{ steps.load_previous_stars.outputs.previous_stars }}          if [ $NEW_STARS -gt $PREVIOUS_STARS ]; then            echo "There are new stars: $NEW_STARS stars (previous: $PREVIOUS_STARS)"            curl -H "Content-Type: application/json" \              -d "{\"content\": \"The repository has gained new stars! Previous: $PREVIOUS_STARS → Total: $NEW_STARS\"}" \              ${DISCORD_WEBHOOK_URL}          else            echo "No new stars"          fi
      - name: Save current stars count        run: |          echo "${{ steps.get_stars.outputs.stars }}" > previous_stars.txt
      - name: Update cache with new stars count        uses: actions/cache@v4        with:          path: previous_stars.txt          key: stars-${{ github.repository }}-${{ github.run_id }}
Step 5: Run the Workflow
Section titled “Step 5: Run the Workflow”The workflow has a workflow_dispatch trigger, which means you can run it manually from the GitHub Actions tab in your repository. You can also wait for the next scheduled run (every hour) to see it in action.
The first time you run the workflow, it will probably send a notification saying that you had 0 stars and now you have X stars (the current number of stars).
To be honest, we are a little bit lazy, so we didn’t implement a complex logic to handle this first run, or even when the count of stars decreases. But you can always improve the workflow to suit your needs! This is just a starting point.
Automation is really cool! You could do the same thing for your followers in your GitHub profile, send notifications by email, Slack, etc. But automation is not limited to just notifications. You can also automate tasks like deploying your code, running tests, and much more.
The possibilities are endless!
A few words before we finish:
- Want to spam us with stars? You can add some stars to https://github.com/Open-reSource/openresource.dev. We will be happy to get some notifications on our mobile phones!
- Please let us know if you’d like to see more automation tutorials like this one!
- We haven’t created a reusable workflow, shared it in the Marketplace, nor created a GitHub Gist. We thought it was easier just to share a little bit of code in this article that you could start from and adapt. If you want it to be stored somewhere with a more formal MIT license, please let us know! But please feel free to use it as you wish.
Happy coding! 🎉